Thursday, January 30, 2014

How to Clean Your Makeup Brushes

First of all, congratulations to STEPHANIE the winner of the giveaway! I've already contacted her and will be sending her stuff soon!! I love having giveaways and can't wait to have some more. And it allowed me to meet some more people, so HELLO new followers! Thank you, thank you, thank you, guys! 

Now.. onto more serious things: cleaning your makeup brushes!  

Washing your brushes should be a regular part of your routine. Every time you use your brushes you're picking up more oil, bacteria, dirt, and of course makeup. The longer you go between cleaning your brushes, the longer all that 'yuck' is breeding in the bristles. Skipping this step can lead to clogged pores and breakouts. Not to mention it keeps your tools in much better condition and allows them to work better. 

Ideally you should do a quick cleaning every day with something like Sephora's Daily Brush Cleaner. Just a quick spritz after each use usually does the job; however, I know this isn't always practical. The most important thing is the deep cleaning. They say you should do this weekly, but I find that it starts to cause my brushes to shed and deteriorate quicker, so I stick to every 10-14 days. (Shh, don't tell!)

I tried a couple different things to clean mine and ended up coming up with my own unique method. I first tried using a shallow bowl full of water but I got really tired of constantly dumping the water, and I went through tons of brush shampoo that way. I eventually quit buying the expensive brush cleaners and this is how I clean my brushes nowadays!

You'll Need: 
- A plate
- A mild dish detergent like Dawn or Baby Shampoo
- A sink
- A towel rack
- Hair bands
(the last 2 are for drying.. you'll see!)

Step 1: Apply a nickle size (or less depending on the brush) drop of cleaner on a plate

Step 2: Wet your brush, the bristles only, with lukewarm water. Try not to get too much water into the ferrule (the metal part that holds the bristles and the handle together) 

Step 3: Swirl your wet brush around in the dish soap/baby shampoo. Make sure you get the cleaner all in the brushes and swirl it all around on the plate. (This is why I like to use a plate because its easier to use without having to dip your entire brush in water) You'll see makeup on the plate until the brush is completely clean.

Step 4: Rinse your brush of all the excess makeup with lukewarm water
Step 5: Rinse all the makeup off your plate.

Step 6: REPEAT! 
* You will more than likely still have makeup and soap in your brush. So I like to swirl a couple more times, rinse, and then add a tiny amount of soap and do it all over again. I would say it takes about 3-4 swirl/rinse cycles until most of the makeup is gone. Of course, it depends on how dirty and how big your brush is. Just be sure that all the soap is gone (you may have to use your hands to rinse the brush one last time and make sure its rinsed completely). You'll know you're done when the water runs completely clean and you don't see any makeup on the plate at all. 

Now is the fun part... Drying! I'd like to think I came up with this idea on my own, but I didn't. I found it on Pinterest. (Speaking of that.. are you following me on Pinterest yet?! Click here!)

Genius, right?! Its really important to dry your makeup brushes upside down because it keeps water from pooling in the ferrule. Like I said above, the ferrule is the metal part that holds the brush-end and the handle together. There is glue in the ferrule that binds everything together, and if you allow water to get in and stay there it can loosen the glue and cause your brush to fall apart. Hanging them upside down also allows them to keep their shape without any flat spots, and lets air circulate all around which makes for even drying. Prior to discovering this method, I was shutting the handles of my brushes in my cabinet doors! It worked okay but I had brushes all over my kitchen that would sometimes fall into food, the sink, etc! 

Grab a couple hair bands, take the towel off your towel bar, and loop your brushes through the band! As you can see I grouped smaller brushes together. I was so excited to find this method and hopefully you'll find it as useful as I did! 

Keep in mind, they do make actual brush shampoos and cleansers, so you could always use one of those instead of the dish soap or baby shampoo.. I just like the cheaper option! 

Have a great day everyone, I hope this was helpful!
Tuesday, January 28, 2014

The Battle of the Blurs

Have you seen these yet? I keep seeing commercials for them and displays everywhere, so I finally gave in. I picked up the L'Oreal Miracle Blur a week or so ago when I saw that they were selling smaller sample-size tubes, then, for comparison, I recently picked up the Garnier 5Sec Perfect Blur. They're sort of like primers that can be used under or over makeup. They are supposed to blur lines, wrinkles, and other imperfections and smooth your skin. I'll just get right to it, here are my thoughts.. 

L'Oreal Revitalift Miracle Blur
Their claim: An oil-free instant skin smoothing finishing cream that "instantly blurs lines,
wrinkles, pores, and uneven textures."
Price: $24.99 for full-size, 1.18 fl oz (at Ulta)
(there is also a version with SPF 30)

Pros: 
- A lot of product, would last a while, as a little goes a long way
- Has an SPF 30 version which would be great for the beach, pool, etc in the summer
- Didn't make my skin feel oily on its own
- This product did make my large pore areas look minimized and smoother

Cons: 
- Once my makeup was applied I started feeling greasy
- Has a scent, which I don't like
- Felt as if putting foundation over the product sort of wiped it away
- Felt silicone-y and waxy

Garnier Skin Renew 5 Sec Blur
Their claim: Instantly fills and blurs lines, wrinkles, and pores, smooths flaws, and
mattifies shine with light reflecting technology. 
Price: $16.99 for full size, 1 fl oz (at Ulta)

Pros: 
- Makeup glided on super smoothly over this product
- Seemed to act as a true primer and kept my makeup on longer
- Blurred and minimized my pores 
- Toned down some of my redness
- Seems more like a lotion and didn't have as much of a silicone feel

Cons:
- Smaller tube that seems to have a lot of air in it, which means less product
- Does not have an SPF version available 

Winner: Garnier 

Overall, I really prefer the Garnier Skin Renew 5 Second Blur. Both products are pretty even when it comes to wearing it on naked skin and do great on their own, without any makeup. If you are like me and don't like wearing makeup to the beach, pool, amusement park, etc, the L'Oreal Miracle Blur would be great to wear on its own. It does a great job of minimizing my pores and smoothing everything out. The Garnier 5 Second Blur does great on its own as well, but it is amazing under makeup, which is where it shines.

I was kind of nervous about it because it doesn't really say anywhere on the packaging whether its to be worn under or over makeup, or if it is okay to wear with makeup at all. But I decided to take the risk, and applied it under my foundation. The best part of the product, in my opinion, was how smoothly my foundation applied. I felt like it took half the time it normally takes to apply foundation and I couldn't believe how smooth and easy it felt while going on.

I was pleasantly surprised when, at the end of the night I noticed my face was nice and matte, my makeup stayed put all day, and my face was visibly smoother and my pores were significantly smaller. I was shocked that my skin even felt smoother. After dinner I touched my face in certain areas to see if it felt greasy to the touch, and it actually felt very smooth and.. different. I couldn't put my finger on it, but it felt nice. 

In comparison, when I used the Miracle Blur under my makeup, it sort of seemed like I was wiping it all away when I applied my foundation, and a few hours later, I felt a bit oilier than normal and I assume it was the Miracle Blur and extra layer of product on my face. 

Both products have pros and cons, as you can see. If you don't wear foundation that often the L'Oreal Miracle Blur would be great to use all over your face to smooth wrinkles and make your face appear smoother overall; however, if you're looking for something to wear under your makeup to act as a primer, mattifier, and something to smooth and 'blur' your skin, I'd definitely try the Garnier 5-Second Blur.

Hope this gave you a good idea on which product you should purchase, and saved you from having to buy both.. like I did! Have a great day everyone, and don't forget about the Drugstore Makeup Giveaway! Thursday is the last day to enter, so go, go, go! 
Saturday, January 25, 2014

Naked Basics.. all you need to know

Today I want to talk about the Urban Decay Naked Basics Palette. I've mentioned before how much I love this palette, and I do, but I want to be clear that I don't think this palette is for everyone. 

But first, lets talk about matte shadows. 

In case you were wondering, the word 'matte' means dull and flat with no shine. So a matte eye shadow is a shade that has no shimmer, glitter, shine, or sheen to it at all. Its a plain, flat color. Doesn't sound too pretty, huh? But it can be.

really like matte shadows. There was a time when I didn't like them because I thought it looked flat and boring, but I did some research, and some learnin', and realized that if done properly it can look really neat and different. I love to play around with matte looks, and I think its a great way to make your eyes look really natural and pretty and stand out and be a little different at the same time. The first time I fell in love with a matte look was in this leighannsays video. (Go check her out.. she's one of my favorite YouTubers!)
A photo of the matte look she created.
See? Sort of dramatic and natural, all at the same time.. if that's even possible.

Okay, so now that we know how pretty matte looks can be.. Let me be real: ITS HARD! It took me a long time to realize just how much you need to blend these types of shadows. They can be very hard to apply if you don't know what you're doing (and I'll be honest, I don't claim to 'know what I'm doing' at all). After I bought my first matte eyeshadow quad and tried to use it, I put it away and decided it wasn't for me. I just couldn't get it to look seamless or blended at all, so I gave up for a bit. But after a while I picked it back up and kept trying, and I eventually mastered the art, sort of. I learned some important tips and tricks to creating looks with matte shadows, and I'll share them with you. 
1. Get a good brush.
If you don't have a good, soft, blending brush, it isn't going to work. I prefer the big blending end of the double-ended brush that came with my Naked 2 Palette. (If you don't have a Naked 2 palette, this brush can be purchased in-store at Ulta, but not online). The softer and fluffier the better, stay away from dense brushes, they don't blend as well. 
2. Use a primer.
Its really important to prime your eyes first so that the shadows go on smooth. My biggest complaint with matte shadows at first was how they went on blotchy and just weird. Once I started priming my eyes, I saw a huge difference in the way the shadow went on and in the overall appearance and opacity of the shadow.
3. Create a base with a skin tone shadow.
I like to take a creamy color similar to the color of my skin or a setting powder and apply it all over the lid. When you do this, it allows all the other colors to glide onto the skin without looking choppy or uneven. 
4. Use a shade that is similar to your skin tone to blend.
I take a light, flesh toned matte color and put a little on my blush to blend. Don't go too far into the color you're trying to blend, just add the light color to the edges and work in wind-shield wiper motions back and forth until it creates a seamless look. 

Okay.. so now that I've gone off on a tangent about matte shades, I'll get onto my main point. 
5/6 of the shadows in the Naked Basics Palette are matte. So no, I don't think this palette is for everyone. I think people look at the Naked Basics palette and think that its just a more affordable ($27), smaller Urban Decay Naked palette, but that isn't true at all. Urban Decay released this palette because so many people requested a matte version of the Naked palettes. Naked 1, 2, and 3 only have 1 or 2 matte shades per palette. So Naked Basics was created to have an entire array of mattes, ranging from light to dark. Venus is, however, a shimmery white shade, and the only shimmer in the palette. 
Venus: shimmery creamy white. not too glittery at all, just a slight sheen.
Foxy: a yellowy cream color with a matte finish, goes on very smooth and creamy.
W.O.S.: (Walk of Shame) a more cool-toned matte pink. perfect for an all-over lid color.
Naked 2: a light soft brown, with a matte finish.
Faint: this color is surprisingly darker than you'd think. a matte medium brown.
Crave: just your basic matte black. great to use as a liner. very soft and smooth.

I think this palette is great for people who like matte shades in general and know what to do with them. I also think this its great if you want to mix and match with other shadows from other palettes. Like I said here, matte shades are the only thing I put in my crease, as a rule. So I think this palette would be work if you had some shimmery eye shadows to create a look with, and use the matte shades of the basics palette to use in your crease. 

As a whole, though, this palette may not be for you, especially if you aren't experienced with matte colors and don't want to mix and match with other palettes. I wanted to write a post on this so everyone would be more informed about what they're purchasing, and so you don't go out and buy this palette because you see "Urban Decay Naked" and $27 (as opposed to $52) and think you're getting a deal. Honestly, I think it would be a great move for UD if they would come out with a similar palette, with more user-friendly shades. Sort of like Lorac's Pro to Go palette which has some of the best shades from the Lorac Pro Palette + blushes, in a more travel-friendly palette. Urban Decay, GET ON THAT! I hope I didn't totally confuse anyone or ramble too much, but felt the need to get it off my chest! Have a great day everyone :)

Thursday, January 23, 2014

Drugstore Makeup Giveaway!

** CONTEST CLOSED **
thank you to all who entered!! 


Its giveaway time!! Thank you guys so much for getting me to 100 likes on Facebook so quickly! I honestly was afraid that 100 likes was asking a lot, since I only had 40. I was considering making it a slightly smaller goal, but I went with it anyway. I went to bed last night and woke up and I had over 130 likes overnight! Thank you so much for sharing the page and my blog. I honestly just love talking about beauty products and decided to make a blog to rant and ramble and share, whether anyone ever read it or not. And I'm so thankful that there are a few of you who do read my blog and enjoy it :) 

I've already picked up a few items but there are some on the way as well. I ordered a few things online and they didn't make it here in time, but they'll definitely be sent along with the other items to whomever wins! 

You can win... 
- My favorite Eco Tools large powder brush
- Rimmel Stay Matte powder in Translucent 
- Tweezers
- Revlon Lip Butter in Peach Parfait
- My favorite Loreal Telescopic Mascara
- Essie nail polish in Bahama Mama
- Revlon ColorStay nail polish in Stormy Skies
- One of the new, amazing Wet n Wild eyeshadow palettes in The Naked Truth
(I liked this so much I bought one for myself!)
Not pictured: 
- A super cute cosmetic bag to keep it all in
- Real Techniques Shading Brush
- Urban Decay Double Ended Eye Pencil (from yesterday)

All you have to do is... 
- FOLLOW this blog
- COMMENT this post to tell me you entered
That's it!

And in case you were wondering.. 

The giveaway will end next Thursday, January 30th, at noon. Be sure to share with your friends.. tweet it, instagram it, share it on Facebook, etc. Its much more fun when there are lots of entries! Thanks guys!
Wednesday, January 22, 2014

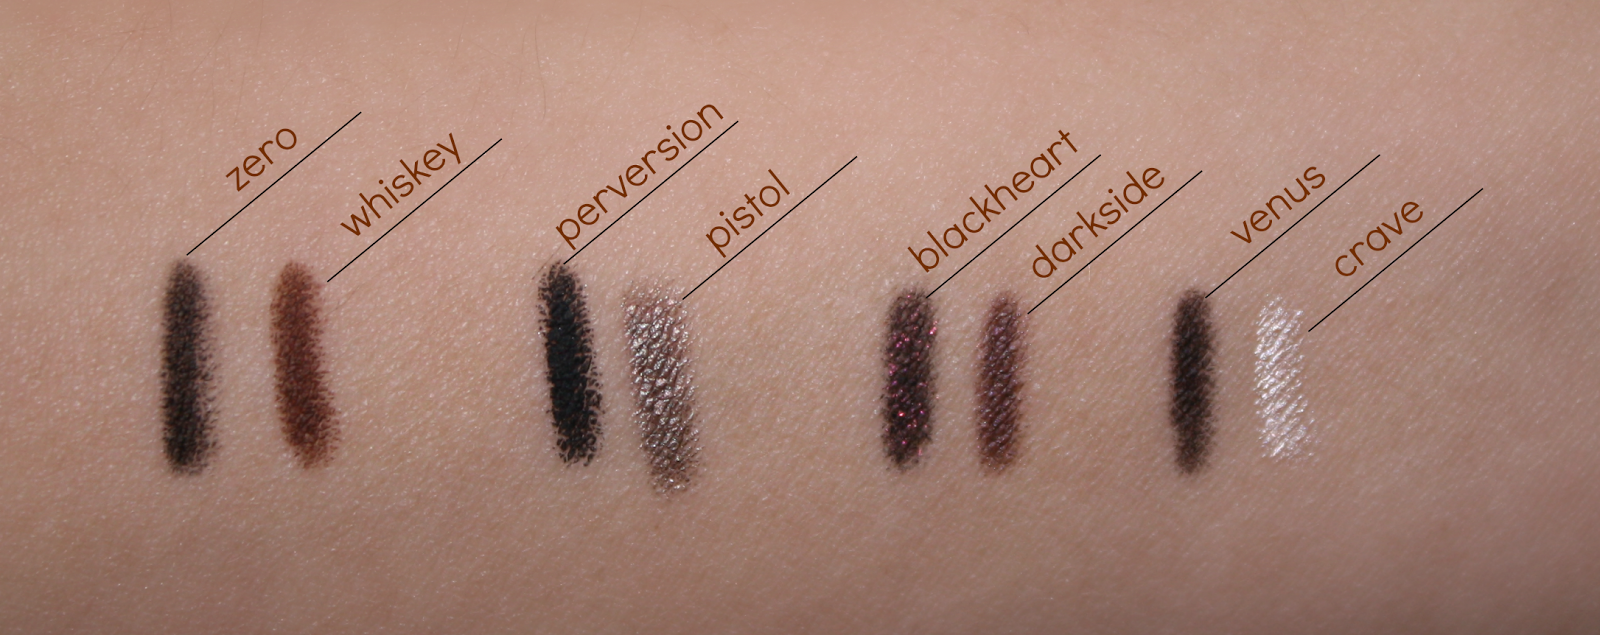
Urban Decay Naked Double-Ended Eye Pencils Review w/ Swatches

** be sure to read the two updates at the bottom of the post ** 
I haven't heard too much about these but, as usual, I fell into the whole impulse-buy section at the counter at Ulta. The only one they had left was Naked 2 so I got it and fell in love with it right away.. so, because I
feel it is my duty to blog about every beauty product I love, I decided to order the other 3 to try them
out and report back ;)

What is it: 4 dual-ended eye pencils that correlate with the 4 different Urban Decay
Naked palettes. Naked, Naked 2, Naked 3, and Naked Basics.
Price: $16 each


Naked
Zero: nice basic black creme liner
Whiskey: a rich matte brown. 
My thoughts: I was pleasantly surprised to see matte colors. They're great shades that would work well with all of the palettes. They glide on really easily and can work for upper and lower line. I like that Whiskey isn't too red, because it works well under the eyes without making my eyes look red. 

Naked 2
Perversion: a super black black. very dark and creamy. 
Pistol: light gray/brown taupe-ish shimmer. 
My thoughts: This was the first pencil I owned and the reason I bought the rest. They go on so smooth and the black is the blackest black I've ever seen! Pistol looks amazing on my lower lash line. Pistol is also a shadow in the Naked 2 palette and they look very similar. A great way to incorporate the same shade on the lid and lower lash line! (Click here to see Pistol eye shadow)

Naked 3
Blackheart: deep black with bits of red micro-glitter (same as Blackheart shadow)
Darkside: purplish-taupe satin.
My thoughts: Honestly, these are the exact duplicates of the 2 correlating shadows in the Naked 3 palette. They both have a pinkish purplish hue, and will be a great complement to the palette itself. Blackheart looks exactly like the shadow itself, and Darkside is pretty close to its 'twin shadow' as well. (Click here to read all about the Naked 3 palette and to see swatches of the shadows)

Naked Basics
** Note: In the photo above, I switched the names of the 2 shadows, so Crave is actually the first swatch (on the left) and Venus is the one on the right. **
Venus: gorgeous off-white shimmer.
Crave: very deep matte brown.
* My thoughts: I was glad they included Venus because I was afraid they would do only matte shades for the Naked Basics palette, since the majority of the shades are matte. I love the shimmery white for highlighting (obviously) and Crave is perfect for when I want a dramatic, dark look but don't want to use black. 

Overall, I really like these eye pencils. They are colors I would use all the time and with a few exceptions, I'd interchange all the pencils with any of the palettes. My only "eh" would be Naked 3's Blackheart. I'm not into sparkly/glittery liners, and I don't see myself using it since it has a bit of a purplish red hue; however, I'm definitely going to try it out on my upper lash line to see how it looks with the other shadows in the palette. Other than that, I love the pencils and plan to use them all in lots of different ways! 

** UPDATE ** 

I woke up this morning and realized I never washed the swatches off my arm.. so I decided to keep it on to see how it lasted. The eyeliners claim to be 24 hour pencils (I never pay attention that stuff because I rarely wear any makeup for 24 hours! lol) but I was surprised how long they've lasted. Its now been over 24 hours and, although they've definitely faded, they're still standing! Here's a low-quality picture I took on my phone.


Oh yeah, one more thing! I'm going to give away one of these double-ended pencils, along with a bunch of other fun items! 
How? 


Thanks guys!
Monday, January 20, 2014

10 Beauty Don'ts

10 Beauty Don'ts.. and what to do instead!

I'm not a makeup artist. I'm not an expert and I don't know everything. But after a while I started to learn a few things that just don't work on anyone. I've either learned from experience, or from professionals. I think we're all guilty of committing a beauty crime every once and a while.. But take this list. Read it. Learn it. Pass it on. And lets try to help make this world a more beautiful place by preventing these crimes of beauty. ;)

1. Don't wear eyeliner on the bottom only.
- I remember trying this out because I wanted to change my look up a bit. In my mind it would make my eyes look more open or something; however it actually isn't that flattering at all. It ends up bring your eye down and making it look a little droopy and doesn't really create the effect you're looking for.
* If you want to switch up your look, try using liner on the top lid only (as well as tight-lining your upper water line) and skip the bottom liner. Apply mascara to the top and bottom. It will brighten your eyes while doing something a little different. 

2. Don't use shimmery shades in the crease.
- There may be some exceptions to this rule, but for the most part, use matte shades in the crease! This is why I'm so particular about palettes including enough matte shadows, because they're important! Your main goal should be to deepen and define your crease, making your eyes pop. When you add a shimmery shade in the crease it acts as a highlight which actually brings the crease "forward" in a sense which makes your eyes seem more deep set and flat.
* Try using a bright shimmery shade on the lid, a mid-toned matte in the crease, and a matte creamy shade on the brow bone and blend everything out. This is the best way to make your eyes/lids pop, deepen your crease, and make your eyes appear bigger and brighter. 

3. Don't wear foundation darker than your neck/body.
- I know this seems like common sense, but sooo many people do this! I know its hard to find the right shade. I absolutely hate buying foundations and trying new things because its so hard for me to find a shade that works for me. It can be very frustrating, but nothing looks worse than a dark face and pale body, not to mention it tends to look very muddy on the face, whether you think so or not.
* My #1 tip for buying the right shade: BUY MULTIPLE COLORS! Believe it or not, most drugstores and mass retailers take returns on cosmetics as long as you have the receipt. If you see 2 or 3 colors that you can't decide between, buy them all. I know that sounds silly, but its the best way to guarantee you'll find the right shade. Buy them all, save the receipt, and return the ones that don't work. Obviously you shouldn't return it if you've used a ton of it, I don't recommend that at all. But try it once, all over, and see how you like it. And don't rely on one form of lighting. Go from room to room and check the color with different lighting, even if that means taking a mirror outside to see how it looks in sunlight. Having a foundation in the right shade is sooo worth it! And, believe it or not, the best way to assure it matches your body: try it on your collar bone! Or even your shoulder. Sometimes our face, neck, and body are 3 different shades, and if you don't want to look crazy, try some unconventional methods of color matching.

4. Don't over-pluck your eyebrows.
- For whatever reason, eyebrows just stop growing back as you get older. You'll learn the hard way eventually. I, for some reason, have the thickest, coarsest, bushiest eyebrows in the world, so I have to keep them maintained or else I'd look like a hobo. But I'm so careful to keep them to a reasonable size. I've noticed that the ends, which were waxed one too many times, have stopped growing in and now I have to pencil them a bit longer. Nothing looks worse than tiny, skinny eyebrows. They make me cringe and no matter what you were told in the 90s/early 00s, IT ISN'T CUTE!
* If you're unsure about what you're doing, go to a professional! Try the Brow Bar at Ulta. Go to a well-known salon or spa that does brows. Ask for help and have a professional do it. Eyebrows frame the face and can completely change the way you look (trust me- click here to see how important eyebrows are. eek!)

5. Don't skip your moisturizer! 
- Putting foundation over dry skin only emphasizes any dry, flaky patches you may have. If you have dry skin and you've tried it, then you know that's a no-brainer. But for people (like me) who don't have dry skin at all, you may think putting on moisturizer before your makeup only makes your skin greasy.. but that isn't true at all! That extra layer of moisture not only acts as an extra barrier between your skin and the makeup, but it makes a much smoother application.
* My mama always told me, the best time to apply your moisturizer is right after your shower or right after you wash your face. Your pores are open and it absorbs it best that way.

6. Don't try to wear an entire eye shadow palette in one look.
- When I first got my Naked 2 palette I wanted to use all the colors right away; however, the shades in palettes aren't meant to be worn all together at once. You don't need 10 shades to create a look. I can always tell when I'm using too much shadow at one time because my eyes start to look powdery and the shadow looks thick. You only need 4-5 shades tops to create a look.. don't worry about using them all at once!
* This is a good guideline I found on Pinterest on combos that work well together.

7. Don't sleep in your makeup. 
- We all know its bad.. but do we all follow the rule? I didn't. For years. My mom and sister would always fuss at me for not washing my face before bed. But I was just lazy and never felt like it, especially once I was ready for bed! Eventually I made myself do it, and it was the best beauty decision I ever made. It changed my skin in a drastic way. My face is smoother, my pores are smaller, and I have significantly fewer breakouts.
* Find products that you like, that make your skin feel good, and create a routine. Set a timer on your phone. It doesn't have to be right before you go to bed.. do it at 9:00 every night, or after dinner. Use all your products and use the time to pamper yourself. I also use this time to brush and whiten my teeth, put on lotion, and wind down before bed. Read about my facial products here. 

8. Don't leave your eyeliner in a jagged line.
- For some reason eyeliner seems to be tricky even if you consider yourself a makeup pro. Its not easy to do and if you don't have a particularly steady hand, its easy to mess it up. In the past I've applied my eyeliner and it looked a little jagged, so I applied even more eyeliner, which was more jagged... it was a never-ending cycle that ended with me taking off my eye makeup completely and starting over. Sometimes its the liner itself, try something different that has a smoother, easier-to-apply tip. Keep trying new things until you find something that works for you.
* If you can't seem to get a straight line, try buffing it out a bit with a pencil brush. Take some sort of fine-tipped eyeshadow brush and drag it along the eyeliner, smoothing and blending it out. For an even more dramatic look, dip the brush in a bit of dark shadow and apply it over the liner. It creates a subtle smoky eye. 

9. Don't use those sponge-tipped applicators! 
- I don't know why they even include these in drugstore eye shadows anymore.. they are impossible to work with! Not only do they "suck" up most of the shadow into the sponge, wasting product, but its impossible to blend out your shadow with them. You need brushes to blend everything out and to avoid any harsh lines.
* Its honestly better to use your fingers than a sponge applicator. If you're in a pinch and need to apply shadow, use your finger and try your best to blend everything out. Really though, investing in some good brushes is important. They don't have to be expensive. There are some great Ulta brand brushes and of course I swear by Eco Tools which are sold at Walmart, Rite Aid, etc. 

10. Don't wear too much black eyeliner. 
- I was so guilty of this for so many years. If you're rimming your eyes with thick, black liner, STOP RIGHT NOW. It not only ages the eyes, but makes them appear much smaller, and sunken in.
* Change up your routine and try something different. Line the top with black, but try smudging some brown shadow on the bottom lash line, or be brave and skip it all-together. It may take a while to get used to, but once you break the habit you'll be glad you did. Your eyes will look brighter, bigger, and more open. 

Its so easy to get caught up in our routine. You've probably done your makeup the same way every day for years, and you don't realize how switching it up and changing the smallest things can make a drastic difference in the way you look. Try something new! It may look funny for a little while, but you're the only one who will notice. Trust me. Have fun!

Friday, January 17, 2014

Birchbox vs. Ipsy: January 2014

I have been patiently waiting for my Birchbox for a week now.. I usually get mine right on time, and usually before other people I know. But this month's seemed to take forever! It turned out to be perfect timing though, because I got my Birchbox and Ipsy bag on the same day! I'll be completely honest upfront, I wasn't totally in love with either box/bag this month. But I'll get to it and go ahead and compare.
[To see my December Birchbox click here]

1. Nail Rock "Velvet" (Full Size, $6.99) - A 2-step DIY textured mani kit. Apparently you just use 2 coats of polish, dip wet nails into 'velvet dust' and let dry. Excited to use it! And its definitely a color I'd wear. 
2. Ahmed Tea (Full Size, $7) & 3 Packs of 100% Pure Coconut Nourishing Body Cream (Full Size, $15) - The tea is super yummy. I'm actually sipping on hot raspberry tea as I write this blog post. The body cream seems interesting.. not sure why there are 3 small packets instead of 1 big one, but oh well. I think I'll get use out of these 2 samples, so that's whats important.
3. Resist C15 Super Booster (Full Size, $45) - I'm not big on trying new skincare products because I'm always leery of how my skin will react, but I'll give this a try and maybe report back. Its an anti-aging liquid that is supposed to brighten and firm skin and fade dark spots.. It seems like a pretty expensive product so I'm going to try to get as much product out of it as I can!
4. Toni&Guy Heat Protection Mist (Full Size, $15) - I'm excited about this because its a brand I'm familiar with, but haven't tried. The only heat protectant I've ever used is a cheaper drugstore brand, so I'm excited to give it a try. 


1. Absolute! Makeup Cleansing Tissue (Full Size, $5) - I'm always excited about new makeup removing wipes because I use them every night and go through them quickly, and because I use them often, I know what I like and don't like. The smell is nice and not too strong, but the actual wipes are a bit dry. 
2. Healthy Sexy Hair Leave-In Conditioner (Full Size, $18) - This was my favorite item from both packages.. I love the Big Sexy Hair line and have been wanting to try Healthy Sexy Hair. Its a pretty good size bottle too, so I'll get more than one use. I'm not big on leave-in conditioner but I'm definitely willing to try it out. 
3. Elizabeth Mott Smooth Shadow in "Pearl" (Full Size, $15) - At first I thought this was just a nude liner for the waterline, but once I swatched it (you can see the swatch next to the photo above) I saw its a nice pretty pearly nude color. The tip (forgot to get a picture) is really small though, so I'm not sure how easy it would be to apply. I'm thinking I'll use it as a browbone highlight. 
4. MicaBeauty Tinted Lip Balm in "Natural" (Full Size, $30) - I was really kind of clueless as to what this was at first. Its a mauve-ish sort of color with a slight pearly sheen. I'm not a fan of having to dip my finger into a balm, especially a colored balm, so I'd have to use a brush to apply it. Its okay, definitely doesn't seem like its worth $30 in the full size. 
 5. Apothederm Bright Skin Serum, Not Pictured* (Full Size, $67) - I forgot to photograph this one for some reason. I was kind of blown away at the full price, it must be a fancy schmancy product. Like the other skin brightening product in the Birchbox, I'll definitely give it a try, although I don't see myself buying it full-sized in the future. 

This month, the winner is...
This was my very first month of Ipsy, and I think I had high expectations which is why I was slightly disappointed. I've seen other bags in the past and they had great things, so I'm sure I'll be happy next month. I honestly thought that Ipsy would come out a winner, but Birchbox had it this month. Mainly because I love tea (if you don't love tea, and got it in your Birchbox, you may have hated this box because it had 3 teas!).

I was disappointed with the quality of the makeup remover wipes and the over-priced tinted lip balm. The nail polish in my Birchbox seems super fun and I'm really excited to try it out. If the Healthy Sexy Hair had been in my Birchbox and not Ipsy, I think it may be the perfect box for me. I also like that Birchbox includes a card with a description and full-size price information on it. I always took that for granted before, but since Ipsy didn't have that, I had to go to their website, log in, click on each item individually to even find out what it was, and then click the link to a website where the item was sold so I could find out the price for a full size. I had to go to the website to figure out what the lipbalm even was.. I thought it may be a cream shadow! Like I said earlier, I wasn't gung-ho about either box/bag, but Birchbox won for this month.

Click here to sign up for Birchbox
Click here to sign up for Ipsy

What do you guys think? Who won it for you? I can't wait to see what next month brings.. In another month or two I'll probably make the decision on which subscription service I cancel, so we shall see! I'd love to hear your thoughts and opinions on the items, so comment below! 
Wednesday, January 15, 2014

Lorac Pro Palette Review w/ Swatches

Lorac Pro Palette Review w/ Swatches!

I've been so excited to review this palette because I just want everyone to know of its awesomeness! And let me apologize in advance for the messy pictures.. this is a very well loved palette. Plus I made the mistake of taking photos of the palette after I swatched, so there are fingerprints and excess powder everywhere! But oh well. Here we go.. 

Lorac Pro Palette Review w/ Swatches!

What is it: A palette of 16 different shades, 8 matte (top row) and 8 shimmery (bottom row)
Price: $42
Best for: All different looks. Works for when you want a natural look, want to play around with color, an everyday natural look, or a smoky eye. Great palette for creating all different kinds of looks.. and all you need is one palette!

Lorac Pro Palette Review w/ Swatches!
Top Row
White: Great for for a subtle highlight since its matte. Pigmented enough to show up but not too white that you look ghostly.
Cream: This is the only shade that doesn't show up well on my skin tone..
I'm sure if you had darker skin it would look great on you. 
Taupe: A true taupe or sienna color. My go-to shade for the crease. 
Lt. Pink: I honestly haven't used this color too much but its very opaque
and is also great for highlighting.
Bottom Row
Nude: Perfect for the inner corner. Shows up great, nice and shimmery
but the glitter isn't chunky. 
Champagne: One of my favorites. Very close to Nude but a bit more pink. Also great for the inner corner, highlighting, or an all over shade. 
Gold: A gorgeous true gold. Very opaque (this took one swipe to swatch!) and gives a great "pop" to any look you go with. 
Lt. Bronze: Pretty much a darker shade of Champagne. Goes really well with with all the other colors in the palette. I like this one in the center of my eye. 

Lorac Pro Palette Review w/ Swatches!
Top Row
Mauve: I honestly feel like this is more of a taupe than Taupe.. but hey, I don't name the colors :) This is another great, matte crease color.
Sable: This color has many uses, including, again, the crease. But I really like it in my outer corner as well. 
Espresso: I love this dark brown because it doesn't have a red undertone, which makes it great to use as a liner under my eyes.
Black: There's not too much to say about it.. its black. And matte, so that's an added bonus. Another great shade to use as liner.
Pewter: I honestly don't think I've used this shade yet and didn't realize it until I swatched it.. and fell in love with it.. and said "wow!" out loud. and then realized I need to use this shade!
Garnet: I feel like this is the "color of the season". I've seen so many great rusty red eyes.. and Garnet is so pigmented its the perfect shade to achieve that!
Deep Purple: This is such a fun color, because I'm brave enough to use it even though I don't typically do color. I can't wait to use it with Pewter. Great for outer corner or an all over color for a dramatic look.
Slate: Kind of intimidating because it looks blue, but its more of a gray on my eyes. Looks great with Black and Nude.

I love this palette overall. My only complaint is the black rubbery/soft packaging (sort of like Nars packaging) only because it gets so messy, and that bothers me. But other than that, I'd say this is the perfect palette for me. I'm planning on doing a comparison with the Naked 2 palette in the future. I never thought I'd say so, but I really do love this palette more than the Naked palettes. Its so versatile, has a great mix of color and neutrals, each color is GREAT quality- not one shade is chalky.. they are all creamy, smooth, and pigmented- and its a combination of mattes/shimmers which I think is what every palette needs. I give it a 9/10 (one point off for packaging!) Have a great day everyone!
Friday, January 10, 2014

Inner Beauty


I wanted to take a moment to talk about inner beauty. This blog focuses on things like finding the foundation that will make your skin look flawless, the mascara that makes your lashes longer, the perfect eye shadow to make your eyes pop.. and that's fun. Being into our looks and wanting to look better is part of being a girl. But I want you to know that I know that isn't all that matters. And I want you to know that too. 

What if no one could see your long lashes, rosy cheeks, and perfect skin. What if all they knew of you was what kind of person you were.. What kind of impression would you make? My parents always raised me to be kind to others and I always have been. I smile at people as I walk by, I'm never rude to waiters or cashiers, and I always try to be polite. But I could do more than that.

Have you ever met someone in passing, at a restaurant or store, or at a get-together, who made a lasting impression on you? Someone who went out of their way to be kind, had such a lovely personality, or someone who was so warm and open that it made you want to get to know them? You can be that person too. It doesn't take too much effort to hold the door for someone, or to be kind to a waitress at a restaurant. 

Or you could even take it one step further. What kind of impression would you make on someone if they couldn't see you at all? I would want them to "see" me as someone who went out of their way to be kind, someone who made them laugh, or someone who was what God wanted me to be, who exemplified the fruits of the spirit. (Galatians 5:22-23) Regardless of what you believe, we could all try a little more to be loving, kind, patient, gentle, and have self control, right? 

So my challenge is this: Go out of your way to be kind. Make it a challenge to do one random kind act a day. Pay for the person behind you in line, compliment a stranger, give a little extra for a tip. It doesn't matter if you never see the person again you may have made an impression on them that lasts forever.. and they may just pay it forward. You can even ask them to pay it forward. I can almost guarantee it'll make you feel good all while making the other person smile. So try it. Lets try to focus a little more on inner beauty this coming year. Embrace your flaws and try to emphasize the person you can be on the inside... and don't worry, its okay to do it with extra long eye lashes and a nude lip ;)
Thursday, January 9, 2014

The 5 palettes you need in your life & why!

The 5 palettes you NEED in your life & why!

Eye shadow palettes are expensive. I'll be honest, none of these are cheap. And just like I said in my high-end makeup post, they're an investment. And if you're going to invest in expensive makeup, I'd say eye shadows are the way to go. I try and try to go back to drugstore eye shadows, especially when I see a color that I like, but they just never meet the quality I've come to love with the palettes above. 

I've actually had a lot of people ask me which palettes they should buy. There are some great ones out there, and when you're spending that kind of money you want to be sure its something you'll use all the time. The palettes I will list below are all great for different reasons, and you can makeup your own mind about which ones you think you'll use the most, and which ones you think are worth investing your money in! 

1. Lorac Pro Palette, $42
I feel bad mentioning this again because I haven't done a review with swatches yet. But I will be doing it very soon, I promise! Anyway, I already mentioned yesterday that I love this palette. There are 8 matte shades and 8 shimmery shades. I feel confident saying anyone will love this palette because it has a little bit of everything. If you're looking for something you can create all different looks with, this is the palette you should buy. You can go dramatic, natural, play around with color, or do something completely neutral. 

2. Urban Decay Naked 3 Palette, $52
I can't stress enough that this palette is not just pinks. There are some really neutral colors that don't look pink at all.. and no, it will not make you look like you have pink eye! This palette is great for romantic looks. Perfect for date night, Valentines Day, weddings.. the list goes on and on. I'm starting to love it more and more every time I use it. If you're just starting out and are leery of these sort of colors, I'd say this palette isn't for you. But if you want to create romantic, ethereal looks and experiment with something out of your comfort zone, please, please, please pick up the Naked 3 palette!! (read more here)

3. Stila In The Light Palette, $40
I almost didn't include this one because the colors in this palette are very similar to those in the Lorac Pro Palette, but compared to all the Naked palettes it has a slightly cheaper price, so I wanted to mention it. Like I said, the shades are similar to the Pro Palette; however, the majority of these shades are shimmers, not mattes. To be honest, I picked up this palette because it includes Kitten, which is one of Stila's most famous and sold-out eye shadows. Its a gorgeous shimmery creamy white that is perfect for highlight the brow bone and inner corners. The other reason was the bronzy/red colors in the palette. I didn't own any like that and wanted to try. Perfect for all seasons, and all the colors work really well together. If you're looking for easy-to-use shadows and shades that can all work together, this palette is great.

4. The Balm's Meet Matt(e) Nude Palette, $42
I know a lot of people are completely intimidated by matte shades. I hear so many people say "Oh I hate matte colors I don't use them" and I can relate because I was that person a few months ago. I admit, they're harder to blend and they seem not as pretty because you don't have sparkle all over your eye. But trust me, once you start to figure it all out, matte shades may become your favorite. They're perfect for a striking, more natural look. This palette is THE only one you need to create matte looks. The colors are creamy, all work well together, and there are so many great colors in it that you may not even know you need.. but you do! Obviously I included this palette because you do need matte colors. (Please, please, please don't commit the sin of putting a shimmer in your crease.. it makes your eyes look so much smaller!!) If you're looking for great matte shades, buy the Meet Matte palette.. I found mine on HauteLook for much cheaper than the retail price. (Read more about this palette here.) 

5. Urban Decay Naked & Naked 2 Palettes, $52
I included these together mainly because I consider them one in the same.. in a weird way. Yes, they have mostly different colors and are two completely different palettes, but the fact that they're so neutral and have the same purpose, made me want to group them together. I don't own the original Naked palette, only Naked 2. So I can't do a full comparison. But they both create such natural, "nude" looks and the quality is the exact same. If you want a combination of warm and cool browns, greys, taupes, bronzes, and light highlight shades, this is the palette for you. There is no color, all just earth tones. Which I think is a great starter palette for anyone. I recommend this for anyone who, like with the Lorac Pro Palette, wants to experiment, play around, and get daily use out of a palette.. but unlike the Pro Palette, doesn't want use too much color. As for a distinction between the two palettes, I suggest going into Ulta or Sephora and looking closely at them yourself. Swatch them, compare them side to side. You make the decision on which shades you think you'd use more. I honestly don't think you can make a mistake with either palette. 

I'd love to hear your favorite palettes.. and if this helped you find your perfect palette, let me know!

Wednesday, January 8, 2014

Best of Beauty: 2013

Makeup Your Mind's Best of Beauty 2013

Its already 2014.. Craziness! I've always been into beauty and makeup, but not to the level of obsession I hit this year. I read beauty blogs, watched tons of tutorials on YouTube, read reviews on all sorts of products, bought way too much, and more importantly, I tried new things! And with that.. I discovered some of my absolute favorite things for the whole year. Enjoy! 

Skincare
Clarisonic Mia 2
I just got the Clarisonic for Christmas and I'm already in love. I'll probably do a full review on it after I've been using it a little longer. It is a handheld device with a vibrating brush for exfoliating, removing makeup, and cleansing the face. It can completely change your skin, and I noticed a difference after just a couple uses. Definitely a must-have if you're a makeup wearer. 

Arbonne RE9 Advanced Skincare Set
I wont say too much, because I already did a full (long) review - you can find it here. Just know that I still use it, still love it, and I think its definitely worth the price. Go check out the review to hear more about its benefits, what it has done for me, and how it can be purchased. 

Face
Covergirl Outlast 3-in-1 Foundation
Have you ever had a foundation that you liked, but forgot you liked? I used this for a while and told everyone about it because it had such great coverage and looked great on my skin... then I tried some new things, and forgot all about it! I recently switched back and fell back in love with it. Like I said, it has great coverage, doesn't make me shiny or oily (of course, I always use a mattifying setting powder no matter what), and it really does last all day! 

Rimmel Stay Matte Powder 
I've probably mentioned this plenty of times here and there. Its cheap and basic, but it works. I use a large, fluffy powder brush to apply it all over my face after my foundation, and then set my undereye concealer. To be honest, I also use it a lot to blend my eyeshadow and make for a really neutral natural look. 

Too Faced Chocolate Soleil Bronzer
This is the perfect bronzer for contouring because its matte, but its such a great shade that can be used all over to warm up the skin. I already talked about it here so you can read some more details. I pretty much use it every day, and have been for a long time now, and I'm nowhere near hitting pan, so it has a lot of product as well!

Eyes
Lorac Pro Palette
I can't wait to review this for you guys. I need to get my lazy butt in gear. It is such a great palette and I regret waiting so long to get it. I got it for Christmas and I've used it pretty much every day since. I don't want to say too much since, like I said, I'll be doing a full review soon.. but I love that the top row is matte colors, the bottom row is all shimmer, and its a mix of color and neutrals. Its been a couple weeks now and I still haven't used some of the colors! Its going to be a lot of fun to play around with.

Naked 3 Palette
Like other products above, I've already done a full review, so you can check that out for a detailed description. But I had to mention it because its a close second to the Lorac Pro Palette (yeah.. I said it.. I like the pro palette more than any of the Naked palettes!!). This is a really great palette though, and contrary to popular opinion, it isn't just for pink looks. There are many neutral/natural looks you can achieve with this palette, because each shade works so well on its own or combined with the other shades. 

Wet n Wild 'Walking on Egg Shells'
An awful big shift in price points, right? :-) I went from $50 palettes to a $3 palette. Wet n Wild shadows are amazing and the quality is just as good as any high-end shadow, in my opinion. Plus, they're super affordable. I prefer Walking on Eggshells because the colors are neutral, work well together, and can create 1 look with the 3 shadows alone. 

Anastasia Brow Wiz
This product is pretty new to me because I never used to do a thing to my brows. I have relatively dark, thick brows that don't need a ton of work (besides getting them waxed- they can be very bushy). When my hair was light, my brows were dark (I'm naturally that way, always have been) I never wanted to fill them in and make them even darker. But now that I have dark hair, I've been playing around a bit! I heard so many good things about the brow wiz that I decided to try it, and so far I love it! It has such a fine tip that its a really subtle difference and you can go as drastic or as natural as you want. It also has a neat little spooly thing on the end to comb through your eyebrows and blend everything out.

L'Oreal Telescopic Mascara
This has been mentioned a couple times already, so I wont bore you. I love the long, skinny brush and that it does my bottom lashes so well. I can also focus on each individual top lash making them super long and dramatic. I'm currently trying a new mascara though, so I'll have to update you on that soon... :)

Real Techniques Shading Brush
This brush stood out to me this year because of the great quality at a cheap price point ($6). It has lasted a while and still in great shape, plus it has multiple purposes. Its just flat enough to go right into my crease to define it before blending, but I mainly use it to apply a dark shade to my outer corner. It makes everything effortless and natural, and that's why I love it so much. 

Lips
Revlon Just Bitten Kissable Balm Stain in Crush
Like I mentioned in this post, I just recently started experimenting with lip color this year. The Kissable Balm Stain is the perfect lip product to help you transition into the world of dark lips. It glides on smoothly and easily in one thin layer, with just enough color, or can be built upon for a darker look. It has a minty feel and lasts a long time. I have only tried this color but plan to pick up more! 


Nails
Revlon ColorStay Polish in Stormy Skies
I actually just got this color for Christmas (my husband picked it out for me!) but it became a favorite really quickly. I got so many compliments on it. I love Revlon CS polishes anyway because they last forever and the brush makes it really easy to paint mess-free. This color is really great though because its so many different colors in one. Its pretty much a gray, but looks purple, green, blue, and tan all depending on the lighting. You wouldn't expect that from the bottle though! 

Seche Vite Dry Fast Top Coat
I've seen this at nail salons, and a lot of YouTube girls raved about it but it took me a while to try. Its a tad bit pricey (around $10-$11) and I thought that was silly for a top coat.. but the key is that it dries SO fast. Its the perfect top coat for running out the door. I'd say once it is applied, your nails are dry in 2 minutes, tops. I did learn the hard way, though, that it shouldn't be used as a base coat. I tend to use a clear polish for a base/top coat all the time, but if this one is applied under the polish it causes it to peel right off (actually peeled off in one whole piece, not just chip) the next day. But hey, try it under glitter polish. Maybe I just came up with a great idea! 

This year, I tried new products, at all price points. There were some I liked, and some I didn't. And there were those that I kept going back to over and over. This list was the "best of" all the beauty products I tried throughout the year and wanted to share with you. I'd love to hear what your 2013 favorites were :)